Thursday, May 19, 2011

Expecting boy #2... Baby Shower Prep

Yep, another baby boy is on its way and it's time for our baby shower...
After our ultrasound appointment, I came home with a few nice 3-D prints of our new baby and started thinking on how I could incorporate them into the shower...  My inspiration for the party invite came from photo booth strips, so I put three images lined in a row and adorned it with a yellow and white polka dot frame. The shower was planned for the spring (although where I live it feels like winter ALL the time!), so yellow was a fitting choice for a fresh and sunny Sunday brunch.

I liked the look of the invitation and decided to carry this black-white-yellow color combination throughout the decoration. I wasn't so sure if it was going to work until I found these great cupcake liners at Etsy.  Happy. Very happy mamma.
I wrapped chocolate bonbons in yellow fabric and tied them with a mix of polka dot, stripe and solid black and white ribbons.
I have this wire "pregnant lady" dress form since my first pregnancy.  Adding a black and white ribbon plus a yo-yo ponytail holder makes it look fresh and new again :-)
These cute paper pinwheels were made using double-sided scrapbook paper, floral wire, buttons and a barbecue skewer. Instructions are at the end of this post.
Developing the (bilingual) menu... 
I printed baby pictures of me and Mr. B in black and white and framed them in yellow polka dots for an eye-catching centerpiece.
 My homemade granola stars in another baby shower brunch.  Recipe here. 
This time around, I will use it as party favors and distributed the granola among small spice jars.  Since most of the guests at the shower will be Brazilian, I made labels saying "Homemade Granola. Thank you!!" in Portuguese and added a small ribbon to each.
Another use for the sonogram prints - sparkling juice "labels", printed on adhesive paper and cut using scallop scissors.
An old and forgotten wood box gained new life after a couple coats of paint :-)
I had some super cute fabric appliqués from Etsy to be ironed on baby clothes and thought it would be a neat idea to have my friends "do the work" for me :-) As I mentioned before, I am not a fan of baby shower games, but in this case, not only I would end up with a keepsake from each of my guests, it would be up to them to customize (or not) a bodysuit or shirt on their own time during the party.  To display the pieces, I wanted to set up a "laundry-like" area complete with an ironing board and clothespins. To go with the event color pattern, I painted the clothespins yellow and added some white dots to them.
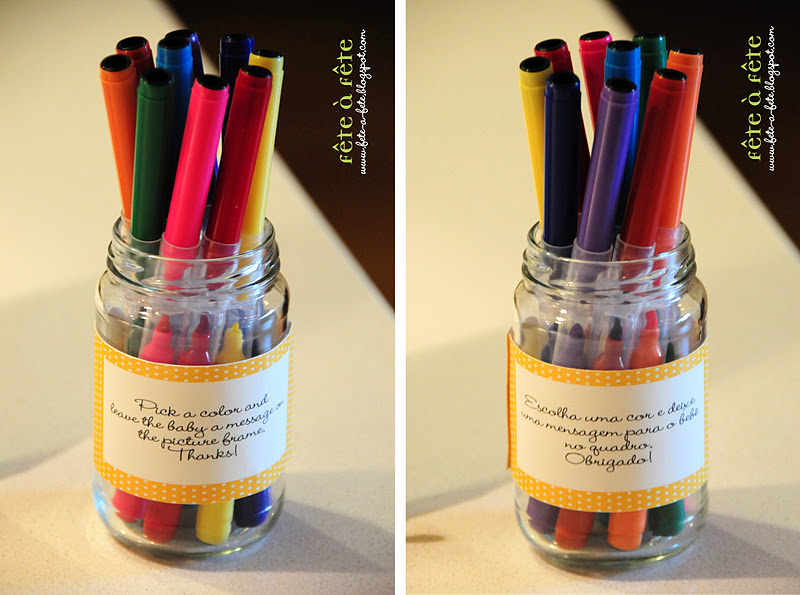
As I did for his big brother's shower, I enlarged the print invitation and framed it so guests could write baby (no name yet...) a message.  I gathered colorful markers in a used condiment jar and added a label with instructions both in English and Portuguese.
The buffet ready to accommodate the drinks.  Stay tuned for Part II of this post, with more details of the party. See ya!!

Pinwheels How-To
(adapted from here - with great step-by-step pictures!)
 
You'll need:
scrapbook or construction paper
push pin or other fine piercing object
hole punch
wooden skewers/dowel
scissors
button
floral wire
Directions:
Fold your paper lengthwise, and then again, to make 4 squares. Cut along those lines. Working with each square at a time, cut a slit from each corner, stopping before getting to the center. Punch holes in one corner of each of these "triangles". Use your pushpin to punch a hole in the middle of the square. Fold your floral wire in half and thread a button into it. Start (loosely) folding the paper aligning the corner holes over the middle hole & hold them in place.  Once you have all four folded in, poke the two ends of the floral wire into the hold and pull through. Put your dowel or skewer through the two pieces of floral wire. Twist close to the dowel and then wrap the remaining wire around the dowel.

Para uma versão em português da festa, clique aqui.

Saturday, April 30, 2011

Indian Potluck Dinner

Occasionally, a group of our close friends gets together for an "International Potluck".  It works like this: the current host picks a country and each guest brings a dish based on its cuisine.  It was finally my turn, and I chose the delightful, aromatic and even magical cuisine of India. 
We usually just send out an e-mail letting all know when, where and what each person will bring. Because I really like every aspect of home entertaining, I decided I needed to go all out with a themed invite as well. I used the free font "samarkan" and a henna-inspired print for the electronic invitations. 
I layered Indian-inspired curtains, table runners, sarongs, scarves and shawls I already had at home on the table to serve as "tablecloths".
The stainless steel hammered dish/bowl on top of each gold charger plate is called a kadhai or karahi.  It is actually a cooking vessel traditionally used in Indian and Pakistani cuisine and looks like a rounded bottom wok. I found these at World Market, and thought they'd look great as "plates" at the table.
 
Most of what I used for this dinner I already had at home, with the exception of the food itself.  Then I went to World Market to pick up a couple of extra kadhais and some incense and that's when I fell in love with their "Henna Flatware Collection." It was just perfect for our dinner, even though I didn't exactly need another set of utensils...
 
   
Samosas, rice pulao, chicken korma, tikka masala, aloo gobhi, chutneys, raita... Ok, I'll stop now, or I'll start drooling all over my keyboard...

Indian breads - chapati, naan, papadum


The vibrant color combination yellow-pink-orange of these lanterns from Pier 1 went really well with the theme creating a warm atmosphere.
I handed guests bindis and temporary "henna" tattoos to be worn during dinner, and sent them home with packets of soothing incense.
I turned my living room into a "lounging area" where guests could chat and sip their mango lassis.
A "sari-like" curtain played the role of a table cover and as additional seats, two large round floor pillows made for a cozy ambiance.
I gathered several different candle holders, and arranged them on an antique tray.
 
Masala dabba, a traditional Indian spice box, containing the spices I used on the meal's preparation. Guests could help themselves to some more spices to adjust the seasoning to their liking, but also, by leaving the box on the table, I wanted the aromas and colors to prepare my friends' palates :-)
Organic Chai and Chai Rooibos teas to accompany the sweets after dinner.
 
My dessert was an ice cream called kulfi, made with pistachios, almonds, saffron threads and cardamom, which are some of my favorite foods and spices.  You'll find a similar recipe below, enjoy!!

saffron, cardamom & pistachio kulfi

(recipe from Epicurious)

ingredients
1 1/2 C. 1% Milk
1 1/2 C. Half & Half
4 whole Cardamom pods
A few Saffron Threads
5 TBS. Sugar
1/8 C. Chopped Pistachios
preparation
Pour the Milk and Half & Half into your pan and add the Cardamom pods. Heat on medium-low. Once the milk is warm, take 2 TBS. of milk and soak the saffron for a few minutes, then pour the saffron infused milk back into the pan. Stir the liquid often while it all cooks down to 1 C (1/3 of the liquid). Then strain out the cardamom pods, add the sugar and pistachios and cook for a few more minutes. Pour into molds and freeze until solid.

Para uma versão em português da festa, clique aqui.

Saturday, January 8, 2011

Gabriel's 3rd Birthday Party - a GabriElvis Tribute

Ever since we stopped by Elvis Presley's home, Graceland, on a cross-country road trip, my then 2-year-old has been the biggest fan of the "King of Rock 'n Roll." While most of his friends ask their parents to play Elmo, Mickey or Dora, the Explorer songs and videos, my son asks us to play Elvis' hits such as Suspicious Minds and Burning Love. So when it came to plan his 3rd birthday party, I had no doubt on my mind it was going to be an Elvis-themed one... a little curious fact: idol and fan share the same birthday, 8 January!!
I had a design in mind for the invitation, and while in Brasil visiting family, I asked my sister to help me bring it to life using her awesome design skills. I then printed the cover image on glossy photo paper and cut in the shape of a CD sleeve. Inside were the party details written as a record label on a black cardstock paper "disk".
The colors chosen were black (inspired by the Elvis' silhouettes), blue (as in blue suede shoes) and white (to balance it all out).
At the beverage table I set an Elvis record on a display stand with a couple of silver permanent markers for friends to leave a message for the birthday boy.  The vinyl record and its cover are now framed and on display in his bedroom.

The main food table
For the table centerpiece, I used "leftover" Elvis silhouettes from my work crafting the gift bags (keep reading to know more about it...), plus black music notes-shaped large confetti and silver stars sprinkled all over the table.
Caprese salad "on a stick" with homemade pesto (recipe at the end of this post)
Some of the food served was inspired by the King's favorites as barbecue chicken pizzas and the famous peanut butter and banana sandwiches (and it didn't hurt that they were a hit among the kids...)
To display the food names, I chose "Welcome to Las Vegas" placecard holders as a reference to Elvis' Las Vegas phase.
Musical notes and guitar-shaped pita bread with homemade hummus
Star-shaped toasts with salmon-chive spread
This amazing cake was made by my talented "cake master" friend Theully.  I found a similar image online and asked her to re-create adding a few personal touches.  For the record label I used an Elvis CD sampler that came with a Collector's Limited Edition box of Elvis PEZ dispensers. 
As a "cake topper", I used these Elvis bendable figurines which Gabriel now carries everywhere with him in his backpack.
Paper crown hats for the kings and queens of the night :-)
The candle is another collector's piece - a hand-painted candle modeled after a Red Hagstrom Viking II guitar Elvis used during his 1968 TV special.
I had a small surprise reserved for my little star - a recording of Elvis singing Happy Birthday!!  His face when he recognized his idol's voice (even before many of the guests did) was priceless.
For the party favors, I continued to use the black and blue theme colors. I printed an Elvis silhouette, traced it down on black card stock paper and hand-cut them individually to be glued on the front of each gift bag.  Yes, cut them one. by. one.  Glad I only had about half a dozen bags to prepare :-)
An Elvis Presley themed birthday is not necessarily "kid-friendly", but I managed to find great items for the favor bags: the "King" paper crown, a plastic microphone, Elvis-style sunglasses, Elvis PEZ dispensers (featuring 3 versions of the King: 50's, 60's and 70's Elvis), and an Elvis CD entitled: "Elvis Sings for Kids" which includes songs like Old MacDonald and Teddy Bear. I even had an Elvis interactive dress-up magnet set for kids to play with.  The little tag attached to the bag's handle reads "Thank you. Thank you very much", which many know is how Elvis ended his songs and/or his concerts.

Life is good... Gabi in his Elvis suit.
Photo by "tia" (auntie) Katia who, along with my parents, came from afar especially for the party. 
I also dressed the part wearing a Priscilla Presley beehive wig I found on Ebay ;-) The Elvis sunglasses were distributed to the guests upon their arrival, along with blue, black and white leis which were a nod to Elvis' Hawaiian movies.

We were even awarded a special performance by our little "king" :-)


Pesto alla Genovese 
Adapted from "Il Grande Libro della Cucina Tradizionale Italiana"

The "secret" to a good pesto is on the freshness and quality of the ingredients you use, so make sure you get the freshest basil, the best quality parmigiano-reggiano, salt and olive oil. Buon Appetito!

Ingredients
  • 15 organic basil leaves (washed and lightly patted dry, stems removed) 
  • 1-2 cloves of garlic
  • sea salt & freshly ground black pepper
  • 15 g toasted pignoli (pine nuts) 
  • 25 g finely ground parmesan
  • 3 tablespoons good quality extra virgin olive oil
Method
Place garlic and a pinch of salt in mortar and start rubbing it down with the pestle to break up the garlic (the salt helps grind it.) Add teared pieces of basil and smash using a down and outward motion, being careful not to bruise it. Add the pignoli and pound, working them into the garlic and basil mixture.  Mix in the parmesan and then the olive oil, mixing with a wooden spoon. Season with salt and pepper to taste. Transfer to a storage container and cover with a fine layer of olive oil to preserve its color, moisture and flavor. Store covered with a lid or plastic wrap in the refrigerator for a week or more, depending of your storage conditions (and use, mine never lasts past a couple of days, since we find so many uses for it in the kitchen!)  

You can also freeze it in small ice cubes and remove as needed.  Some purists say you should never freeze pesto because of its oil content, others advise on freezing it without the addition of the cheese.  I personally think that yes, nothing beats the amazing flavor of just-made pesto, but the handy frozen cubes of this sauce mean less time in the kitchen, less loss/waste of ingredients and a small feeling of summer in the middle of the winter, when I cannot pick fresh basil from my backyard.  In other words, still very yummy!

Note: The traditional pesto is made using a mortar and pestle to smash all the ingredients into a paste, but you can use a food processor as well (but try to avoid, ok?) Just make sure the blades and bowl are very cool so that they don't burn and bruise the leaves - you can put them in the freezer for a couple of hours prior to use. 


Para uma versão em português da festa, clique aqui.
Related Posts Plugin for WordPress, Blogger...